Nationality: American
Born June 1, 1904 in Covington, Kentucky, United States.
Died May 17, 1992.
George Hurrell was a photographer who was interested in the image of glamour presented by Hollywood during the 1930s and 1940s.
In his younger years, George Hurrell had no interest in photography, but originally studied as a painter. He first started using photography, only as a medium for recording his paintings. After he moved to Laguna Beach, California, George Hurrell became more interested in photography and found that it was a more reliable source of income than painting.
He was encouraged by his friend aviatrix Pancho Barnes, who would sometimes pose for him. After this, he opened a photographic studio in Los Angeles.


Richard Avedon
Nationality: American
Born May 15, 1923 in New York City, United States.
Died October 1, 2004, San Antonio, United States.
Richard Avedon was an American Fashion and portrait photographer.
The New York times: "His fashion and portrait photographs helped define America's image of style, beauty and culture for the last half-century."
Richard Avedon's mother was the person who encouraged his love of fashion and art. His interest in photography emerged where, at age 12, he joined the Young Men's Hebrew Association camera club.


Youseph Karsh
Nationality: Canadian
Born, December 23, 1908 in Mardin Turkey.
Died, July 13, 2002 in Boston, United States.
Youseph Karsh was an Armenian-Canadian Portrait photographer.
At the age of 16, he was sent to live with his uncle George Nakash, who was a photographer. Youseph briefly attended school there and assisted in his Uncle's studio. His uncle saw great potential in his nephew and in 1928, he arranged for Karsh to apprentice with portait photographer John Garo in Boston, United States. His brother Malak Karsh was also a photographer, so all these people in his life influenced and encouraged him to become a portrait photographer.


Skills in using lighting
For this task, we were put into small groups and took a number of photos using the 3-point lighting system. We had a chair in the middle surrounded by three lights so we could get the perfect exposure and lighting. Firstly we had the key light, to the side, in front of the person on the chair which had the strongest and most influence on the look of the scene. It was placed to one side, so that this side was well lit.
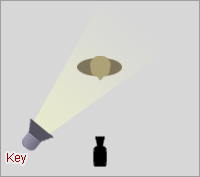
We then placed a second light, on the other side to the key light which acted as a fill light, which helped to fill the shadows created by the key light. It was slightly softer and less bright than the key.
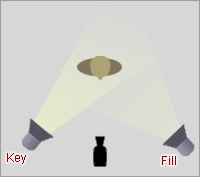
Lastly we used a back light, towards the side and behind the chair. It did not provide direct lighting, but provided definntion and subtle highlights around the chair and the person who was getting photographed, outlines.
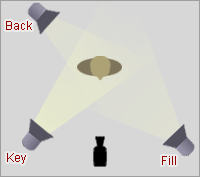
The control settings of the camera was set on aperture priority, shutter priority, fully manual and fully automatic. We played around with the different settings to get the right photo.
Low key/ Chiaroscuro lighting:
Low- key lighting is a necessary element in creating a chiaroscuro effect. It often uses only one key light, optionally controlled with a fill light or a simple reflector. Low key light accentuates the contours of an object by putting areas into shade while a fill light/reflector may illuminate the shaw areas to create an effective photo.

Chiaroscuro uses strong contrasts between light and dark, usually bold contrasts affecting a whole composition. Sometimes helps the use of light achieve a sense of volume in modelling three-dimensional objects and figured.

George Hurrell used both low-key and chiaroscuro lighting in his work:


Richard Avedon very often used Low-key lighting in his photography:

Youseph Karsh also, very often used Low-key lighting in his photography:

Setting up 3 Point Lighting
For this task, I will evaluate the photos we took using the 3 point lighting system. I will explain why some of the images were stronger than others.
Successful photos:
1)


2)


This photo was successful because the three point lighting system gave a balanced light for the photo. The shutter speed for this photo was set at 1/5312 seconds giving it a shorter exposure, allowing less light in so that the motion is stopped and the main focus is not blurred. The aperture was set at f/1.8 giving it a shallower depth of field, so that the background is blurred but main subject is still in focus. The ISO speed ratings were set at 3200, giving it a high sensitivity so that the photo was not over exposed. The persons head is the lightest part of the photo, and is slightly exposed but this makes it effective because it highlights that he is the main subject and makes the photo more interesting.
4)


This photo was successful because the body of the person's shadow is captured in this photo making it more exciting and effective, which was caused by the three point lighting system. The shutter speed was set at 1/1600 seconds giving it a shorter exposure, allowing less light in so that the motion is stopped and the main subject is in focus. The aperture was set at f/1.8 giving it a shallower depth of field, so that the background was slightly blurred, focusing all the attention on the main subject because he is in focus. The ISO speed ratings were set at 160 so that there was a lower sensitivity to the light, giving it a higher and smoother quality which is a lot different to the other successful photos. This is effective because we were able to get a range of different photos which all ended up being successful in different ways.
Un-successful photos
1)


The lighting for this photo was successful, because the settings were all similar to the settings of the successful photos taken. the problem with this photo though, is that the main subject was too far down in the photo, leaving to much space above the head, making the photo more dull and boring.
2)


3)


This photo was un-successful because the main subject was over exposed, and the photo is too bright. The aperture value was set at f/1.8 allowing more light in, giving it a blurred background which caused the main subject to become more exposed.
4)


This photo was un-successful because the photo was under exposed, and too dark. This was because the ISO speed ratings were set at 3200, giving it a lower quality making the photo darker than it should be.
Here are some pictures of us doing our work:


No comments:
Post a Comment